If your basement ever holds water or you’re planning remodeling below grade, installing a sump pump protects your belongings and prevents costly damage. A properly installed Sump Pump Installation channels groundwater away from your foundation, giving you reliable, low-maintenance protection against basement flooding.
You’ll learn what tools and materials you need, how the installation process works from pit to discharge line, and which post-installation checks and backups keep the system working when it matters most. By the end, you’ll know whether you can tackle the job yourself and how to avoid common mistakes that lead to clogs, poor drainage, or power failures.
Sump Pump Installation Process
You will assess the site, choose a pump sized to your home’s needs, dig and prepare a proper pit, then mount and secure the unit with correct piping and electrical connections. Each step focuses on safety, drainage performance, and meeting local codes.
Site Assessment and Preparation
Locate the lowest point in your basement where water accumulates or where an interior perimeter drain discharges. Measure available clearance—allow at least 6–12 inches around the pit for access—and check for obstructions like joists, mechanical lines, or finished flooring.
Confirm floor slab material and thickness; concrete requires coring or jackhammer work, while dirt or crawlspace floors need a clear footprint. Verify local code requirements for discharge routing, backflow prevention, and electrical circuit needs.
Plan the discharge path before digging: route PVC to an exterior outlet above grade or to an approved storm connection, and include a check valve and union for maintenance. Gather tools and PPE: drill or breaker, level, tape, PVC cement, gravel, and a dedicated GFCI-protected circuit.
Selecting the Right Sump Pump
Match sump pump type to conditions: choose a submersible pump if you need quieter operation and a sealed installation, or a pedestal pump for easier motor access when space permits. Compare pump capacity by head (vertical lift) and flow rate (GPM). Calculate required head by adding vertical lift from pit to discharge outlet plus friction losses from piping; select a pump that delivers needed GPM at that head.
Choose materials resistant to your groundwater chemistry—stainless or thermoplastic components for corrosive conditions. Prefer pumps with a reliable float switch or electronic level sensor; evaluate warranty length and serviceability. Include a battery backup or generator connection if power outages are a concern in your area.
Excavating the Sump Pit
Mark the pit diameter—common sizes are 18–24 inches—and locate it so the pit intercepts collection drains. Cut or break the slab neatly using a concrete saw or jackhammer; remove dust and debris to expose subbase. Excavate to a depth that allows a 2–4 inch gravel base under the sump liner and positions the top of the liner flush with the finished floor.
Place a 2–4 inch layer of clean, coarse gravel and compact lightly to level. Install a prefabricated plastic or concrete sump basin, ensuring it sits plumb and the top rim aligns with floor elevation. Backfill exterior gaps with gravel for drainage and tamp to stabilize the basin before proceeding to plumbing and electrical connections.
Mounting and Securing the Pump
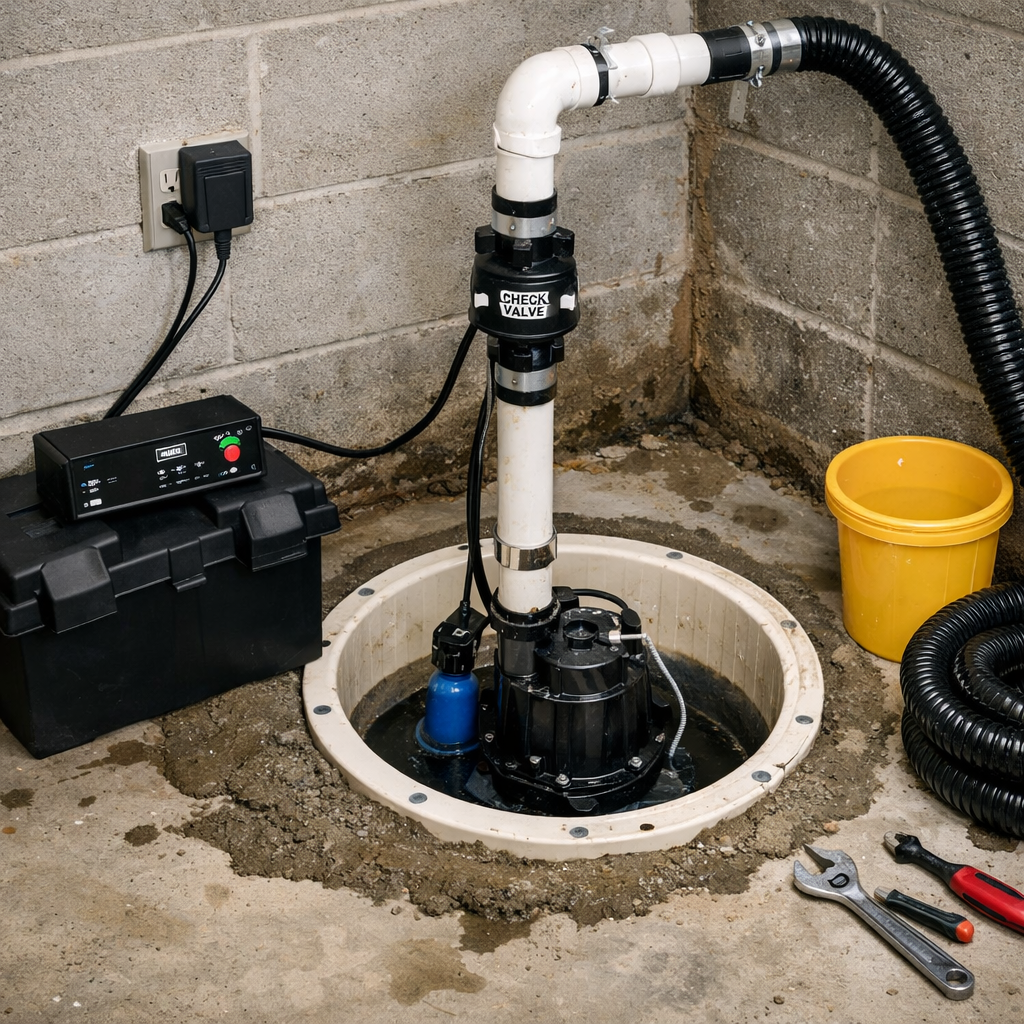
Set the pump into the basin so the float has unobstructed travel; test float movement manually. Secure the pump per manufacturer instructions—some units use a mounting bracket or rubber base to reduce vibration. Install the discharge pipe: use schedule 40 PVC, glue and primer at joints, and slope horizontal runs slightly away from the pit.
Fit a check valve vertically on the discharge piping above the basin to prevent backflow. Support vertical runs with straps every 3–4 feet to prevent stress on fittings. Connect pump power to a GFCI-protected outlet or hardwired circuit sized to the pump’s amperage; avoid extension cords. Test operation by pouring water into the basin, observing pump start, discharge flow, and automatic shutoff.
Post-Installation Considerations
Check the pump, discharge, check valve, and power sources immediately and periodically to confirm they work under load. Plan a routine maintenance schedule and know the most common failure modes so you can act quickly if the system shows trouble.
Testing System Functionality
Start by pouring water into the sump pit until the float activates the pump. Observe the pump run cycle: it should start within a few seconds of the float reaching the switch and run until the water drops to the designed shutoff level.
Verify the discharge line clears water promptly and that the check valve prevents backflow. Inspect outside discharge points for pooling or frozen sections; clear debris and verify the outlet extends at least 6 feet from the foundation or to an approved storm drain.
Test backup power by switching to the battery or generator source, then run the pump again. Check gauges, alarms, or Wi‑Fi monitoring if installed. Record run times and any unusual noises for future comparison.
Routine Maintenance Guidelines
Inspect the pit and pump every 3–6 months; increase frequency if your area sees heavy rain or high groundwater. Remove debris, gravel, and sediment that can clog the inlet screen or wear the impeller.
Change or test battery backups quarterly and replace batteries per manufacturer recommendations, typically every 3–5 years. Test battery under load with a multimeter and perform an annual full‑capacity discharge test if safe to do so.
Lubricate bearings only if the pump manual specifies user lubrication; most modern pumps are sealed. Exercise the float switch monthly by lifting it manually to ensure free movement. Keep a simple maintenance log with dates, actions, and observations.
Troubleshooting Common Issues
If the pump fails to start, check power first: confirm breaker, outlet, and any GFCI haven’t tripped. Next inspect the float switch for obstructions or tangles and the pump intake for blockages.
If the pump runs but won’t evacuate water, look for a stuck or failed check valve, collapsed or frozen discharge pipe, or a broken impeller. Tighten fittings, replace the check valve if you see reverse flow, and clear or insulate discharge lines as needed.
Unusual noises—grinding, rattling, or banging—often indicate debris in the impeller or a failing motor bearing. Stop the pump, remove it for inspection, and replace worn parts or the pump if repair isn’t cost‑effective. If alarms trigger, consult the alarm documentation for the fault codes and act promptly to avoid basement flooding.
Author
admin@genesisgoldassets.com
Related Posts

List of Smart Lighting Trends in Pakistan 2026 That You Must Know
The demand for Smart Lighting Trends in Pakistan 2026 is growing rapidly as homes, businesses, and commercial spaces shift toward automation, efficiency,...
Read out all
Tarpaulin Sheets That Handle Wind, Rain, and Snow
The weather can change rapidly. One bright sunny day came. You can expect windy, rainy, or snowy weather the next day. Bad...
Read out all
Binghatti Developer: Redefining Modern Real Estate in Dubai
Dubai’s skyline is a visual statement of ambition, and at the center of many of its newest residential landmarks stands Binghatti Developer....
Read out all
Top Benefits of CCTV Cameras for Business Security
Running a business comes with endless excitement and ambition, but it also brings a quiet responsibility that never leaves your mind. Every...
Read out all
Wedding Light Decoration Ideas That Set the Perfect Ambiance
Lighting is among the most influential things in the creation of a memorable wedding atmosphere. It affects the atmosphere, improves photography, and...
Read out allThe Power of One: Why the Single Panel Shaker Door Defines Modern Canadian Interiors
There is a peculiar magic in simplicity. In an age of information overload, endless notifications, and visual clutter, the Canadian home has...
Read out all